Summary
Overview
A bot without artificial intelligence can be called a bot? Obviously not. In this tutorial I will try to explain how it is possible, in a few lines of code to add Wit.ai to the Botkit.ai framework.
What are Botkit.ai and Wit.ai?
BotKit.ai
Botkit.ai is described by its authors in this way:
BotKit is the leading developer tool for building chat bots, apps and custom integrations for major
messaging platforms. We love bots, and want to make them easy and fun to build!
The official website of the project is https://botkit.ai/
Simplifying, Botkit.ai is a framework that allows you to create bots, in nodejs, in a very simple, and supports virtually any existing chat platform: Web and Apps, Slack, Cisco Webex, Cisco Jabber, Microsoft Teams, Facebook Messenger, Twilio SMS, Twilio IPM, Microsoft Bot Framework, Google Hangouts Chat.
Wit.ai
Wit.ai is a project made by Facebook, thanks to it the bot learns by itself, thanks to machine learning, how to respond to users, based on examples of conversation that are submitted to them.
The official website of the project is https://wit.ai/
Wit.ai is described by its authors in this way:
Wit.ai makes it easy for developers to build applications and devices that you can talk or text to.
Our vision is to empower developers with an open and extensible natural language platform. We'll use
this blog to share news, feature announcements and stories from our community.
To better clarify the operation of Wit.ai we can refer to the screen below
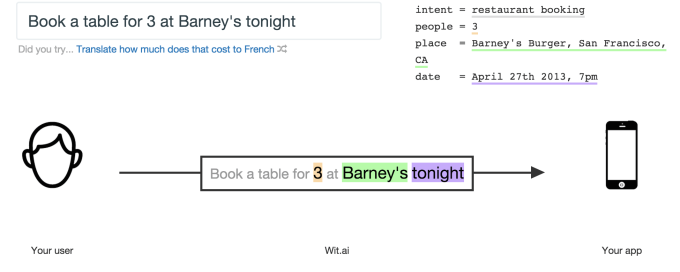
A user's phrase (in text or voice mode) is processed and structured. The service will give us back the intent and the values that will allow us to manage the conversation or the operation to be performed
Let's analyze an example json of an answer received from Wit.ai
User says: "Turn off the lights"{
"confidence": 0.496,
"intent": "lights",
"_text": "Turn off the lights",
"entities": {
"on_off": [
// <-- result entity/action
{
"value": "off" // <-- result value
}
]
}
}The entity value indicates the calculated action, while value is the value received, in the previous case an on_off with off value was recognized, we can for example interpret it as the switching off of something.
First step, let's create a Botkit.ai's project
Let's get to the heart of the action
Install Botkit Use npm to install Botkit. Use the "-g" flag to install it globally, which makes Botkit's command line tool available.
npm install -g botkitCreate your bot It's time to create new Botkit app!
botkit new --platform webThe command line tool will collect a few pieces of information from you, like the name of your bot. Then, it will create a pre-configured and ready-to-customize bot project for you.
Installation complete! To start your bot, type:
cd my_project && node .Boot it up and say Hello! Next, run the app from the project folder. It'll boot up and you'll be able to chat with the bot in your web browser!
cd my_project
node .
You'll see...
I AM ONLINE! COME TALK TO ME: http://localhost:3000
Botkitwit-ts in action
Previously I said that we have to add Wit.ai to Botkit.ai. How you do it? Botkit.ai allows you to use middleware, objects that will intercept our questions, send them first to Wit.ai and forward the json with the reply to botkit.ai.
In this tutorial I will use the middleware developed by me, in typescript, botkitwit-ts (if you find it interesting, rate it :))
First of all we have to add middleware to the project
npm install --save botkitwitOnce added we can move on to the actual action:
import { BotKitWit } from './src/botkitwit'
import { WebConfiguration, WebController } from 'botkit';
import { IConfig } from './src/types/IConfig';
let config: IConfig = { token: 'PUT_HERE_WIT_ACCESS_TOKEN', minimum_confidence: 0.5 }
let wit = new BotKitWit(config)
var Botkit = require('botkit');
var bot_options: WebConfiguration = {
replyWithTyping: true,
};
var controller: WebController = Botkit.socketbot(bot_options);
var webserver = require(**dirname + '/components/express_webserver.js')(controller);
require(**dirname + '/components/plugin_identity.js')(controller);
// Open the web socket server
controller.openSocketServer(controller.httpserver);
controller.startTicking();
controller.middleware.receive.use(wit.receive);
controller.hears(
[
'greeting',
'booking_info',
'weather'
],
'message_received',
wit.heard,
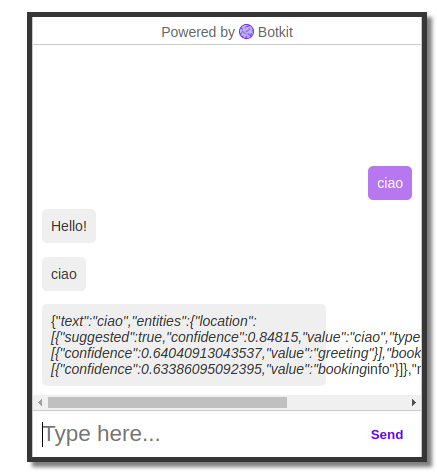
function (bot: any, message: any) {
console.log(message);
bot.reply(message, 'Hello!');
bot.reply(message, message.text);
bot.reply(message, message.response);
}
);
console.log('I AM ONLINE! COME TALK TO ME: http://localhost:' + (process.env.PORT || 3000))
And finally we can test our bot by navigating to http://localhost:3000